HW7: WebGL Renderer

Due Friday 2/19 @ 9:00pm.

Where & What to Hand In

Remember that every source-code file you hand in must have a comment at the top of it explaining what it is, what assignment it's part of, your name, the class name, the date, etc.

Submit all of the following files on Canvas. You don't have to submit a PDF.

Note that it's important to always use exactly the specified filename when handing in work for a CS class. (Canvas may automatically append a number to your filename; that's okay.)

Overview & Getting Started

For this assignment, you will build a projection renderer in WebGL. This assignment does not involve interaction or animation.

You are going to be writing code for this assignment in three languages that I expect are new to you: HTML, Javascript, and GLSL. You don't need a deep understanding of these languages to proceed; you should be able to learn most of what you need from context and looking at the book's examples.

However, the Mozilla Developer Network provides excellent tutorials and references for all three of these languages. So take a look at the MDN Javascript pages and the MDN WebGL pages. If you Google for stuff, you're likely to find hits on a site called W3Schools, which is an unreliable and inaccurate resource, apart from being covered with ads. Every time you visit W3Schools, the Flying Spaghetti Monster loses a meatball.

Before you begin, copy the “Common” directory from the book code to the place where you usually do your work. Then, next to Common, create a new directory called “HW7” and do your work there. Your directory hierarchy should therefore look like this:

<work_dir>
  |
  +- Common
  |    |
  |    +- initShaders.js
  |    +- [ ... more helper code ... ]
  |
  +- HW7
       |
       +- 1-letter.html
       +- [ ... more of your code ... ]

Then do each of these parts. In each part you will create a single matching HTML/JS file pair. Each part involves two steps: a simple beginning and then an “upgrade” to more sophisticated functionality or structure.

Part 1: 2-D Shapes

  1. Create two new files: 1-letter.html and 1-letter.js. Write, from scratch, a program that uses WebGL to display a colored triangle on the page. None of the coordinates of any vertex of the triangle should be 0 or 1. Write your shaders inline in the HTML file (as opposed to loaded from a separate file), and hard-code as much as you want.

    Model your code after the book's example code, and use the helper functions provided by the book in the “Common” folder. However, the code that you end up with should be as simple as possible, with no extraneous cruft. Don't leave vestigial code from the examples that you worked from.

    The primary task of this step is the following: write a thorough comment explaining and justifying each bit of Javascript and GLSL code that you write. To do this, you'll need to refer to the book, the book's example code, and of course your classmates.

    Since this step doesn't involve any transformations, your triangle should be constructed in the canonical view frame, just like the 2-D examples from the book are.

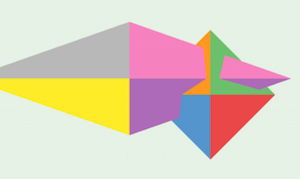
  2. On paper, design a proper triangle tessellation of the first letter of your name. Then upgrade your 1-letter files to display this tesselation. Again, hard-code all your vertex positions, adjacency arrays, color attributes, etc., and refine your comments as necessary.

    The code that you write should not repeat any vertices, and it should explicitly represent the adjacency array (what we've called a “triangle array” in the past). This is nothing new: it's exactly what you did in HW1.

    To accomplish this, you'll need to use the gl.drawElements() function. Look around in the book and online for guidance.

    Here's what mine looks like:

Part 2: 3-D Shape

  1. Create two new files: 2-octahedron.html and 2-octahedron.js. Write, from scratch, a program that uses WebGL to display a colored octahedron in an orthographic projection. Make each face a different color.

    An octahedron has six vertices and eight triangular faces. Each vertex has coordinate ±½ in one dimension, and 0 in the other two. As before, just hard-code all your vertex positions, adjacency matrices, etc., and make sure that you create a real vertex array (with no repeats!) and a real, explicit triangle array.

    Write two functions to construct the arrays for your octahedron in two steps:

    1. Your first function, octahedron(), should produce three arrays with no redundant information: one for your vertex positions, one for your triangle indices, and one for the face colors (one color per triangle). There should be six vertices, eight faces, and eight colors.

      To return three arrays from a single function, bundle them into an anonymous object:

      return {
        verts: your_vertex_array,
        tris: your_triangle_array,
        face_colors: your_color_array
      };
      

      Your vertex array should use homogeneous coordinates. Your vertex shader might therefore have to change to accommodate this fact.

    2. It's very difficult to get OpenGL to work directly with per-face information. Instead, the standard practice is to create duplicate vertices, one for each face that a vertex is part of, and attach information to the vertices instead.

      Your second function, faceToVertProperties(), should take as input the three arrays described above (verts, tris, and face colors) and return an object with new arrays: a vertex array with each vertex repeated for each face it is part of, a triangle array that uses indices in the new vertex array, and a new vert_colors array that has a color for each duplicate vertex.

      (Though this step means that you no longer technically have to use the triangle index array, I'd like you to continue doing that.)

    Since you're doing an orthographic projection from the origin of the canonical view volume, you should end up looking at your octahedron straight-on, like this:

Part 3: Instance Transforms

  1. Create two new files: 3-instances.html and 3-instances.js. In your program, create two instance transforms (each one should be a mat4) that, when applied to the octahedron, will create instances in different poses in the view volume. Pick transforms that will cause your octahedra to intersect in some interesting way, so you can verify that overlaps render correctly. Just hard-code in the values for your transforms (no need to write a bunch of methods for translation, rotation, etc.), using your Python code from earlier in the term to compute the correct matrices.

    Write a Javascript function applyXform() that takes a transform matrix (a mat4) and a vertex array (an array of vec4s), and returns a transformed vertex array (a new array of new vec4s). As always, the only time a method should modify any of its mutable arguments is when it is clearly and explicitly intended to do so. That is not the case here, so make sure you don't modify any of your inputs.

    Use your function to create two instances of the octahedron, and then draw them with WebGL with an orthographic projection, just as above.

    Here's what mine looks like:

  2. [ Note: This step is worth 1 point out of 20. You may choose to skip this step if you wish (and lose the point), continuing on for the rest of the assignment just using applyXform() for your instance transforms. ]

    In your applyXform() function above, you had to manually perform matrix multiplication on each individual element of a (potentially very big) list of vertices. The computation was identical every time, and the computation for each vertex was totally independent from the computation for each other vertex. This is exactly the kind of thing that the vertex shader is meant for!

    Upgrade your code from the previous step to apply each transform in the vertex shader. You'll want to transfer the instance transform as a uniform variable (since the same transform gets applied to each vertex). The GLSL Wikibook chapter on vectors and matrices is a useful resource for this step, as is our book. I also found a nice tutorial on HTML5rocks.com, but unfortunately their live examples no longer work, so you just get code snippets.

    Try to write your code so that you transfer the vertex and triangle arrays to OpenGL only once, and to make as few calls to gl.draw*() as you can. If you really want to dig deep, investigate gl.drawElementsInstanced() and its friends.

    Though you won't be using it anymore, please leave your applyXform() function in place, so I can test it.

Part 4: Perspective Projection

  1. Copy your work from Part 3 to two new files: 4-perspective.html and 4-perspective.js. In this part, you'll add a camera to your world (which should already have two octahedra in it) and then make a perspective rendering from this camera's point of view.

    Decide what you want your camera parameters (position, look-at point, up-vector, angle of view) to be. Document these in a comment in your Javascript code. Then use your old Python code to produce the corresponding world-to-canonical-view transform, and hard-code the values for its matrix into your Javascript.

    Apply the transform to all the vertices in your scene, either in the vertex shader (if you did step 2 in part 3 above) or with applyXform().

  2. Implement perspective division in your vertex shader so that you end up with a perspective rendering of your objects.
  3. Your rendering probably looks a little plain, because there's no shading to give you cues about which triangles are facing which direction. Let's fix that by adding some simple view-angle–based shading!

    1. To see the shading well, each octahedron should be a single color, rather than having different colors on each face. So upgrade your octahedron() function so it takes a color as an argument, and makes all the face colors that same.
    2. Further upgrade octahedron() so that each triangle has a single normal vector, a vec4. (Make sure it's a unit vector! And remember that the w-coordinate of a vector is always 0 in homogeneous coordinates.) Add a new field to your returned object to represent this list of unit vectors. The fields for your returned object should now be verts, tris, face_colors, and face_norms.
    3. Upgrade your faceToVertProperties() to handle per-face normal vectors just like it did with colors.
    4. Upgrade either your applyXform() function or your instance-transform code in the vertex shader so that it works with the normals, too. Remember that instance transforms can cause normal vectors to no longer be unit vectors, so you need to re-normalize each one after applying the transform.
    5. Last of all, upgrade your shaders so that your rendered image shades each triangle's color based on the cosine of the angle between it and some chosen unit vector. Pass in the camera's world-space look vector as this vector.

Part 5: A Whole Scene

  1. Create two new files: 5-scene.html and 5-scene.js. In this final part of the assignment, you'll make a perspective rendering of a whole scene. You may either reproduce your sophisticated scene from earlier in the term, or just add one or two objects to the robot-arm scene. Either way, your scene must have at least five object instances, at least one of which is a cube instance and one of which is an instance of something other than a cube or an octahedron.

    Each shape instance in your scene must have a different color, and at least one object must have faces of different colors. If you'd like, you can experiment with coloring that varies across a triangle.

    Write all the necessary shape functions to produce (verts, tris, normals) objects, just like your octahedron() function from part 2. These functions don't have to take arguments; if you'd like, you could literally just hard-code the vertex and triangle arrays for a finely-tessellated sphere. Don't be afraid to produce tons of triangles; WebGL is really fast!

    Use your Python code from earlier in the term to compute all the instance transforms for your scene. Hard-code these instance transforms as mat4s in your Javascript.

    Apply your instance transforms, send everything to the shader, and produce a perspective rendering.